Please also read carefully the TEXT below this video!
The major enhancement in the new Form wizard, which also applies to all BlueVoda forms independently from the way they have been built, is the Built In Form Processor. This form processor eliminates the need to copy / paste php code and manually create a processing page. The processing script is automatically embedded in your own form page, and it will process your form info correctly. It takes down to practically zero copy / paste mistakes that have caused lots of frustration to many users.
This script has been created with the contribution of DBTechnosystems and has the following enhancements, in comparison to the one used in the BV forms up to this moment:
1. It will automatically take care of file uploads
2. It will take care of Multiple choice Listboxes / Comboboxes
3. It will detect injection attempts and deny processing
4. It will report these errors if found
5. It allows you to specify the Upload folder and the max filesize
6. It will add a random prefix to the file uploaded, to avoid hackers uploading and running malicious files
Please note that these are essential features, for a more complete script that will provide much more both in terms of security and in terms of features, please visit the Advanced BlueVoda Form Processor thread.
Creating an Error page
The new BV 10.1 built in form processor was developed by DB Technosystems.com. We have now embedded a simple error reporting system. To be able to report the errors, you need to correctly build an error page.
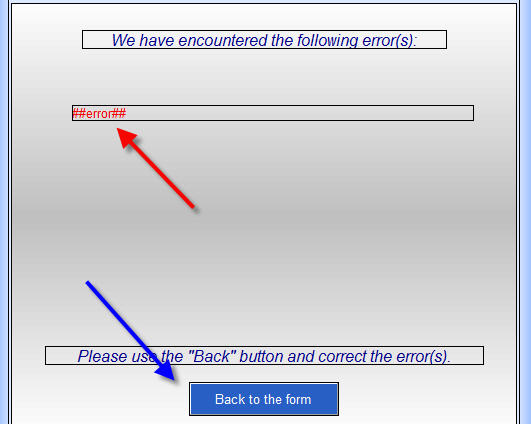
As we have designed the script, this is an extremely easy task: Create a page as you normally would. Leave some free space for the text of the error message. Then, place in your page the following simple text: ##error##
As you see it in the following example:

If an error is found in your form, the error page will show up. The text ##error## will be replaced by the actual error message. You can format the text as you like (Font type, size, color and position, alignment etc) . Make sure to make it LARGE enough (as you can see above) so that there is enough space for it.
Now, insert an ADVANCED button in your page. Double click it, Make it OnClick, and select onClick action: Go to the Previous Page. This button will enable your visitor to go back in your form and edit his input before submitting again.
Multiple Choice Listboxes / Comboboxes
Some times you need such fields. In Addition, there are some tomes that even checkboxes for the SAME choice, need to have multiple answers (values).
In order for the built in processor to correctly process these fields, there is only one requirement: the file names of these multiple choice fields MUST have at the end, [] (square brackets). In example, a field "How did you find us" should be "How did you find us[]" in order for the processor to be able to correctly process it. Of course, you also need to check the "Allow Multiple Selections" checkbox in the field Properties dialog box.
Uploading files.
The new processor allows you to upload files. Normally, the default settings allow a maximum filesize of 1 Mb and the files will be uploaded in a subfolder that is AUTOMATICALLY created, which is named "uploads".
However, it is possible to change the folder name as described in the following steps.
You may also want to change the default maximum filesize, from 1 Mb (1024 Kb) to a lower or higher number.
BOTH these tasks are achieved through HIDDEN FIELDS.
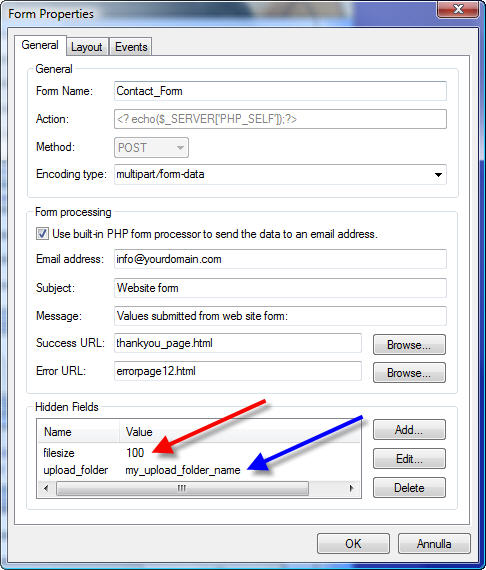
Double click your form, and in the lower part, in the Hidden Fields section, add these two fields:
filesize (all lowercase) and upload_folder (all lowercase).
The filesize MUST be typed in Kbytes.
Please look at the example picture here below:

Important Notes!
1. There are some limitations to the field naming: the visitor's email address field, MUST be named "email", all lowercase, exactly as you see it, so that the script will correctly recognize it. Otherwise, the sender's email address will default to your own email address. This is done because many ISPs will block emails if no sender email address is included in the mail.
2. Your Submit button name MUST be "submit", and your "reset" button MUST be named "reset". If you name them anything else, you will recieve those values in the mail along with the others.
3. Please note that when you use the built in form processor, the page NEEDS to be published as php instead of html. If you have created the form from scratch with the wizard, this is done automatically. So, if your page is named "contact", it will be published as "contact.php". So this is what you should include in your menu bars as link to the contact page.
Troubleshooting: If after publishing yout form page, you see lots of code on top of the page, don't worry, it is simple: you have published your page as html instead of php.
Have fun!
The major enhancement in the new Form wizard, which also applies to all BlueVoda forms independently from the way they have been built, is the Built In Form Processor. This form processor eliminates the need to copy / paste php code and manually create a processing page. The processing script is automatically embedded in your own form page, and it will process your form info correctly. It takes down to practically zero copy / paste mistakes that have caused lots of frustration to many users.
This script has been created with the contribution of DBTechnosystems and has the following enhancements, in comparison to the one used in the BV forms up to this moment:
1. It will automatically take care of file uploads
2. It will take care of Multiple choice Listboxes / Comboboxes
3. It will detect injection attempts and deny processing
4. It will report these errors if found
5. It allows you to specify the Upload folder and the max filesize
6. It will add a random prefix to the file uploaded, to avoid hackers uploading and running malicious files
Please note that these are essential features, for a more complete script that will provide much more both in terms of security and in terms of features, please visit the Advanced BlueVoda Form Processor thread.
Creating an Error page
The new BV 10.1 built in form processor was developed by DB Technosystems.com. We have now embedded a simple error reporting system. To be able to report the errors, you need to correctly build an error page.
As we have designed the script, this is an extremely easy task: Create a page as you normally would. Leave some free space for the text of the error message. Then, place in your page the following simple text: ##error##
As you see it in the following example:

If an error is found in your form, the error page will show up. The text ##error## will be replaced by the actual error message. You can format the text as you like (Font type, size, color and position, alignment etc) . Make sure to make it LARGE enough (as you can see above) so that there is enough space for it.
Now, insert an ADVANCED button in your page. Double click it, Make it OnClick, and select onClick action: Go to the Previous Page. This button will enable your visitor to go back in your form and edit his input before submitting again.
Multiple Choice Listboxes / Comboboxes
Some times you need such fields. In Addition, there are some tomes that even checkboxes for the SAME choice, need to have multiple answers (values).
In order for the built in processor to correctly process these fields, there is only one requirement: the file names of these multiple choice fields MUST have at the end, [] (square brackets). In example, a field "How did you find us" should be "How did you find us[]" in order for the processor to be able to correctly process it. Of course, you also need to check the "Allow Multiple Selections" checkbox in the field Properties dialog box.
Uploading files.
The new processor allows you to upload files. Normally, the default settings allow a maximum filesize of 1 Mb and the files will be uploaded in a subfolder that is AUTOMATICALLY created, which is named "uploads".
However, it is possible to change the folder name as described in the following steps.
You may also want to change the default maximum filesize, from 1 Mb (1024 Kb) to a lower or higher number.
BOTH these tasks are achieved through HIDDEN FIELDS.
Double click your form, and in the lower part, in the Hidden Fields section, add these two fields:
filesize (all lowercase) and upload_folder (all lowercase).
The filesize MUST be typed in Kbytes.
Please look at the example picture here below:

Important Notes!
1. There are some limitations to the field naming: the visitor's email address field, MUST be named "email", all lowercase, exactly as you see it, so that the script will correctly recognize it. Otherwise, the sender's email address will default to your own email address. This is done because many ISPs will block emails if no sender email address is included in the mail.
2. Your Submit button name MUST be "submit", and your "reset" button MUST be named "reset". If you name them anything else, you will recieve those values in the mail along with the others.
3. Please note that when you use the built in form processor, the page NEEDS to be published as php instead of html. If you have created the form from scratch with the wizard, this is done automatically. So, if your page is named "contact", it will be published as "contact.php". So this is what you should include in your menu bars as link to the contact page.
Troubleshooting: If after publishing yout form page, you see lots of code on top of the page, don't worry, it is simple: you have published your page as html instead of php.
Have fun!


Comment